The Application Submission System & Interface for Submission Tracking (ASSIST) system is used to prepare and submit grant applications electronically to NIH and other Public Health Service agencies. Check out this step by step guide for using ASSIST.
On this page you can preview process for:- Single-project Application
- Multi-project Application
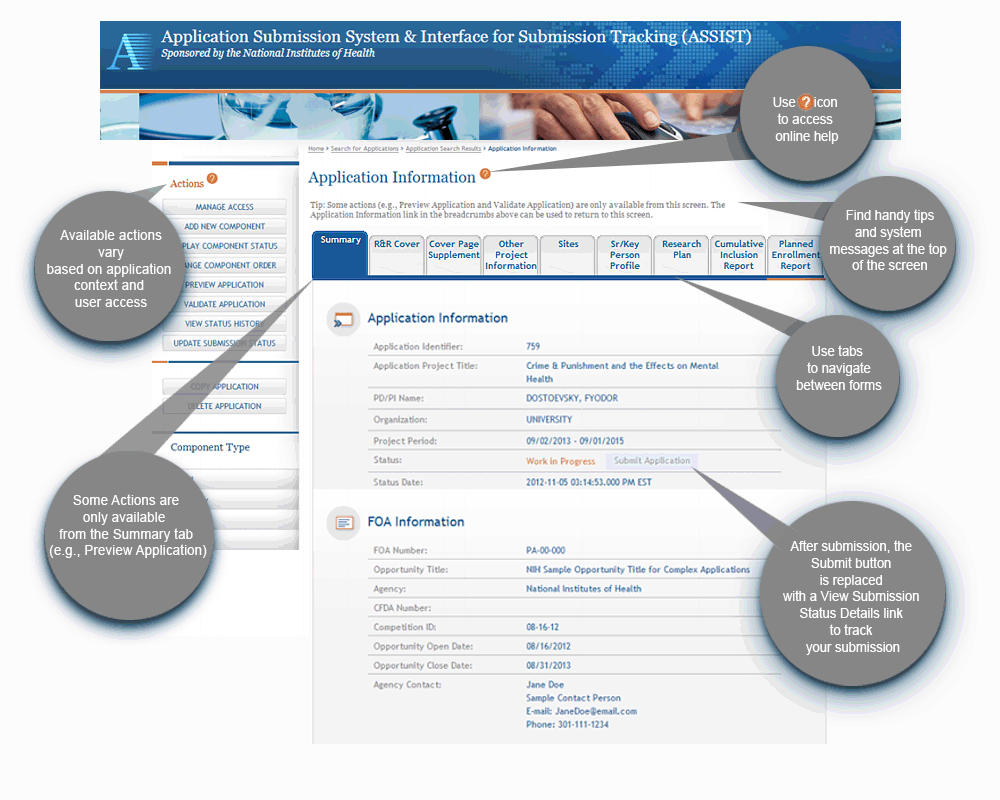
- Navigating ASSIST Screen
Step 1: Find a Funding Opportunity Announcement (FOA)
-
Find an FOA of interest in the NIH Guide for Grants & Contracts and record the FOA number (e.g., PA-16-160)
- The 'Apply Online Using ASSIST' button just above the FOA Table of Contents takes you to ASSIST
Step 2: Make a submission plan
- Decide who will be responsible for data entry in ASSIST and gather their eRA Commons usernames
Step 3: Login to ASSIST & Initiate Your Application
-
Login to ASSIST at https://public.era.nih.gov/assist using your eRA Commons username and password
-
Use the
Initiate Application
feature and your FOA number to get started on your application
- Or, access applications already in progress using the Search feature
Step 4: Provide application access to your team
-
Automatic Edit access is given to:
- All SOs (Signing Official) and AOs (Administrative Officials) at the applicant organization
- The PD/PIs designated on the application (once eRA Commons username is entered in Credential field)
- The user that initiated the application
- Access can be given (or revoked) to additional users using the Manage Access action
Step 5: Enter Application Data
-
Use the tabs across the top of the screen to move between forms
-
Complete the R&R Cover tab first
-
Add
Optional Forms
as needed.
-
Multiple users can simultaneously work on your application, but only one user at a time can Edit an individual form
-
Preview Application
-
Use the
Validate Application
action to check your entered data against NIH business rules
Step 6: Finalize your application and prepare for submission
-
Use the
Preview Application
action to generate a draft application image in the agency format
-
Check the application image for any assembly issues
-
Use the
Update Submission Status
action to change your application from Work In Progress status to Ready for Submission status
- If additional edits are needed, the application must be returned to Work In Progress status
Step 7: Submit your application
-
Use the
Submit
button on the Summary tab to submit to the agency through Grants.gov
- Only active for users logged into ASSIST with an eRA Commons account with the SO role
- Provide your valid Grants.gov Authorized Organizational Representative username and password when prompted
Step 8: Track your application status and view your assembled application image
-
Use the
View Submission Status Details
link to track your application status
- If your application successfully processed through to eRA Commons, the 7-digit Agency Tracking # will be hyperlinked to the eRA Commons detailed status screen
- Carefully check your assembled application image (e-Application) and associated documents in the Other Relevant Documents div of the screen
Step 1: Find a Funding Opportunity Announcement (FOA)
-
Find an FOA of interest in the NIH Guide for Grants & Contracts and record the FOA number (e.g., PA-16-123)
- The 'Apply Online Using ASSIST' button just above the FOA Table of Contents takes you to ASSIST
Step 2: Make a submission plan
-
Carefully read the FOA, noting allowable types of required/optional components and any special instructions
-
Understand the structure of NIH multi-project applications
and how Multi-project Application Images (annotated sample) are assembled.
-
Define the layout of your application (e.g., define components and who will lead each)
-
Decide who will be responsible for data entry in ASSIST and gather their eRA Commons IDs
Step 3: Login to ASSIST & Initiate Your Application
-
Login to ASSIST at https://public.era.nih.gov/assist using your eRA Commons username and password
-
Use the
Initiate Application
feature and your FOA number to get started on your application
- Or, access applications already in progress using the Search feature
- Use the Add New Component action to build out your application
Step 4: Provide application access to your team
-
Automatic Edit access is given to: SOs (Signing Official) and AOs (Administrative Officials ) at the applicant organization; the PD/PIs designated on the application; and the application initiator
- Similar automatic access provided at the component level
- Access can be given (or revoked) to additional users using the Manage Access action
Step 5: Enter Application Data
-
Use the left-hand component navigation and the top form tabs to move between components and forms
-
Complete the R&R Cover tab first
-
Add
Optional Forms
as needed.
-
Multiple users can simultaneously work on your application; only one user at a time can Edit an individual form
-
Use the
Validate Component
and
Validate Application
actions to check your entered data against NIH business rules
Step 6: Finalize your application and prepare for submission
-
Use the Preview Application action to generate a draft application image in the agency format
-
Check the application image for any assembly issues
-
Use the Update Component Status and Update Submission Status actions to lock down editing and prepare your application for submission
- If additional edits are needed, the application must be returned to Work In Progress status
Step 7: Submit your application
-
Use the
Submit
button on the Summary tab to submit to the agency through Grants.gov
- Only active for users logged into ASSIST with an eRA Commons account with the SO role
- Provide your valid Grants.gov Authorized Organizational Representative username and password when prompted
Step 8: Track your application status and view your assembled application image
-
Use the
View Submission Status Details
link to track your application status
- If your application successfully processed through to eRA Commons, the 7-digit Agency Tracking # will be hyperlinked to the eRA Commons detailed status screen
- Carefully check your assembled application image (e-Application) and associated documents in the Other Relevant Documents div of the screen